17 KiB
Setting Up the Chat App
- We use Element.io as our main chat app. Each OpeningDesign project has its own dedicated 'room'.
- To install, go to https://element.io/get-started
- Element has apps for Web, Android, iOS, macOS, Windows & Linux
- Search and connect with
@theoryshaw:matrix.org(Ryan Schultz)
- After loggin in, if you go here, and join the OpeningDesign chat space, you can see a list of current and past projects and their associated chat rooms.
- To install, go to https://element.io/get-started
File Management on Windows
-
If you use a file syncing software like Dropbox, and plan to sync OpeningDesign files to multiple machines (tower, laptop, etc.) make sure the path where the files are synced is the same.
- Examples:
- Laptop:
D:\Dropbox\... - Tower:
D:\Dropbox\...
- Laptop:
- Examples:
-
download favorite text editor
- We like VSCodium or Visual Studio Code, which are basically the same. VScodium is a fork of VScode and a little more open source.
-
Install Git for Windows
- Download from git-scm.com/download
- The following steps might be outdated as they were first logged back in 7/1/2012. In general, you'll most likely be okay, if you choose all the defaults, when prompted.
- 'Run as administrator' as you did with the text editor above.
- Choose an appropriate installation location such as
C:\Program Files\Git - Select Components: Install the default components, including Git GUI Here and Git Bash Here
- Choose default location of 'start menu folder'. Will most likely default to the proper location.
- Choose your preferred Git default editor.
- For example, choose VSCodium or VSCode, if that's your preferred text editor
- Adjusting the name of the initial branch in new repositories.
- Let Git decide
- Choose recommended 'path environment'
- use openSSL library
- Accept the default line ending conversion for Unix and Windows compatibility
- Checkout Windows-style, commit Unix-style line endings
- Use MinTTY
- Default (fast-forward or merge)
- Git Credential Manager Core
- Extra options
- Enable file system caching
- Enable GIT Credential Manager
- Ignore experimental options
- Click Finish to complete the install.
- The following steps might be outdated as they were first logged back in 7/1/2012. In general, you'll most likely be okay, if you choose all the defaults, when prompted.
- Download from git-scm.com/download
-
A few Windows configurations. You might be able to skip the following steps, but might run into problems in the future.
-
Set longpath on windows
- Long answer here
- Short answer
- Go to start menu and type 'regedit'
- Computer\HKEY_LOCAL_MACHINE\SYSTEM\CurrentControlSet\Control\FileSystem
- Right click on
LongPathsEnabledand thenModify... - Value data: 1
- Short answer
- Long answer here
-
Run Git Bash in administrator mode, like this and do the following commands. Do them in the exact following order.
-
-
Create accounts at...
- Gitlab: go to https://gitlab.com/users/sign_up to create an account
- Then set up Personal Access Token here
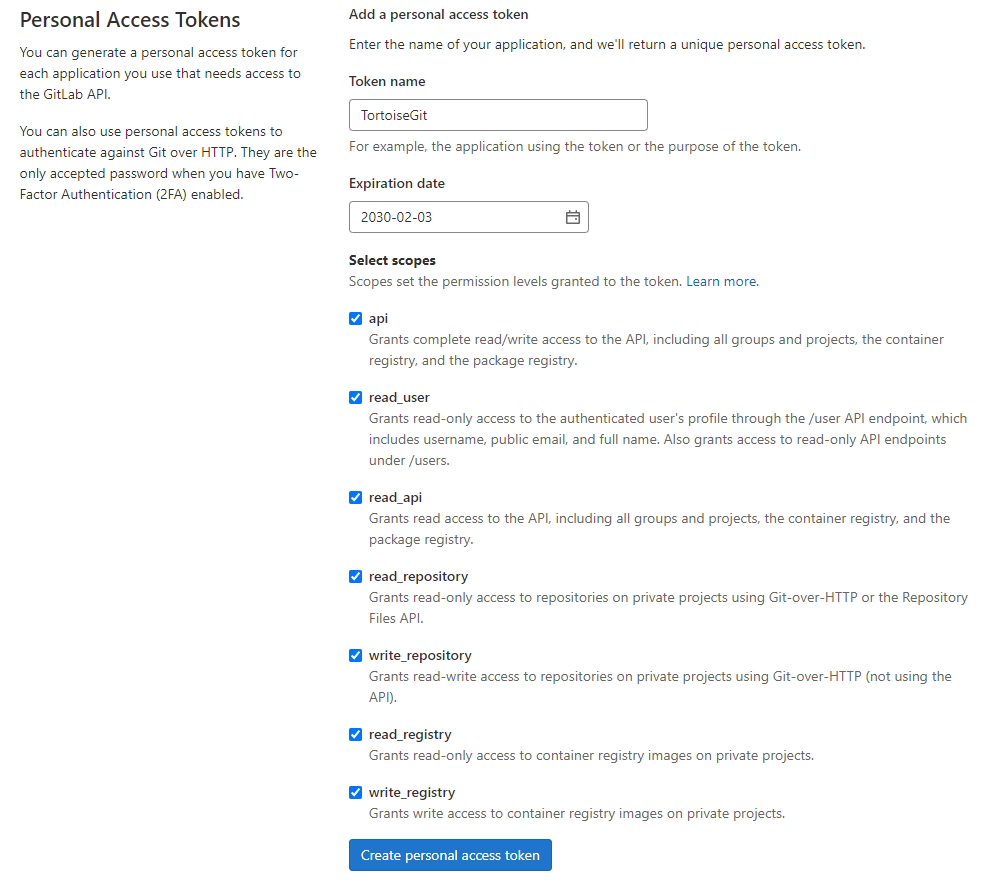
- Save the following token 'password' and don't share with anyone! You will use this as a 'password' for pushing stuff to/from TortoiseGit

- Then set up Personal Access Token here
- Github: go to https://github.com/join to create an account
- Then set up Personal Access Token here
- Gitlab: go to https://gitlab.com/users/sign_up to create an account
-
Download and install https://tortoisegit.org/download/
- The following steps might be outdated as they were first logged back in 7/1/2012. In general, you'll most likely be okay, if you choose all the defaults, when prompted.
- TortoiseGitPlink based on PuTTY...
- Custom setup:
- choose defaults
- Run first start wizard
- Language
- Welcome screen
- next
- Point to git.exe (will probably default to the proper location)
- Configure user information
- add name and email (preferably use the same email you used to with your Gitlab or Github accounts)
- Authentication and credential store
- choose defaults
- The following steps might be outdated as they were first logged back in 7/1/2012. In general, you'll most likely be okay, if you choose all the defaults, when prompted.
-
Follow the steps at the following link to create your private/public GPG keys
Cloning a Repo for the First Time
Essentionally ''cloning' a repo means you're downloading the entire project folder onto your local machine. Once it pulled down (downloaded) you don't have to clone it again.
After it's cloned, if there's a change on the repo you want to pull down to your local machine, follow the steps in the following section: Pulling the latest changes down from the remote repo.
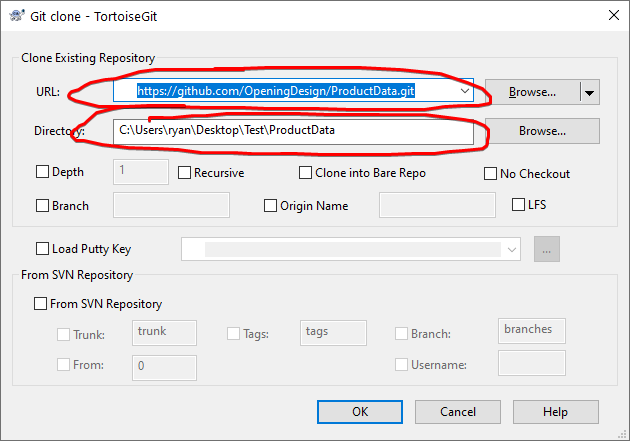
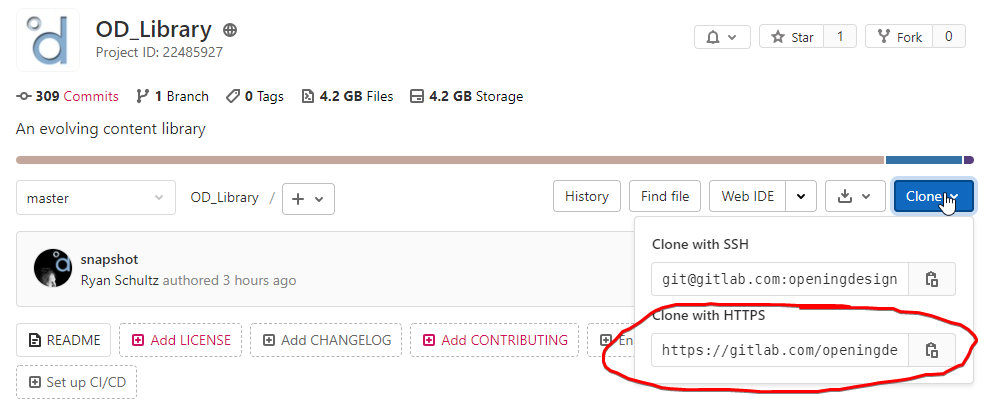
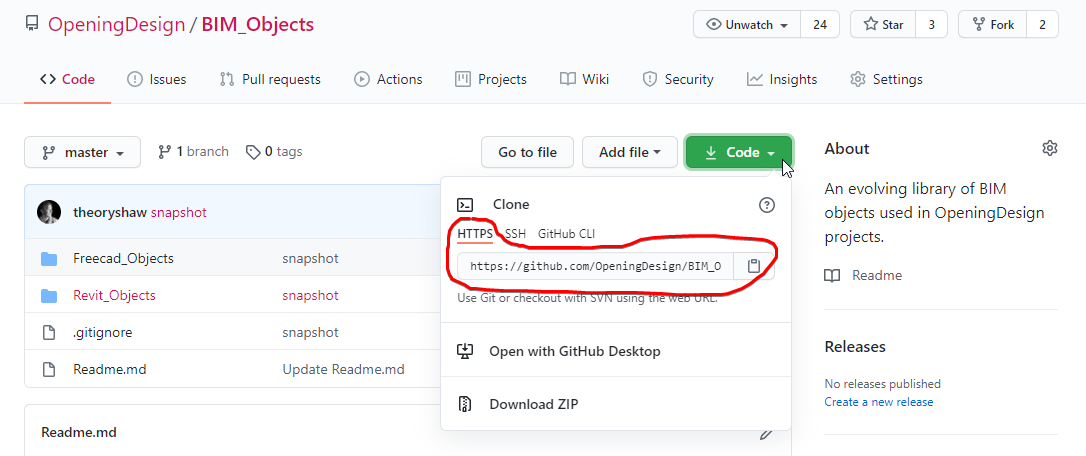
- Copy the HTTPS (not SSH) address from either Github or Gitlab.
- From Gitlab...
- From Github...
- From Gitlab...
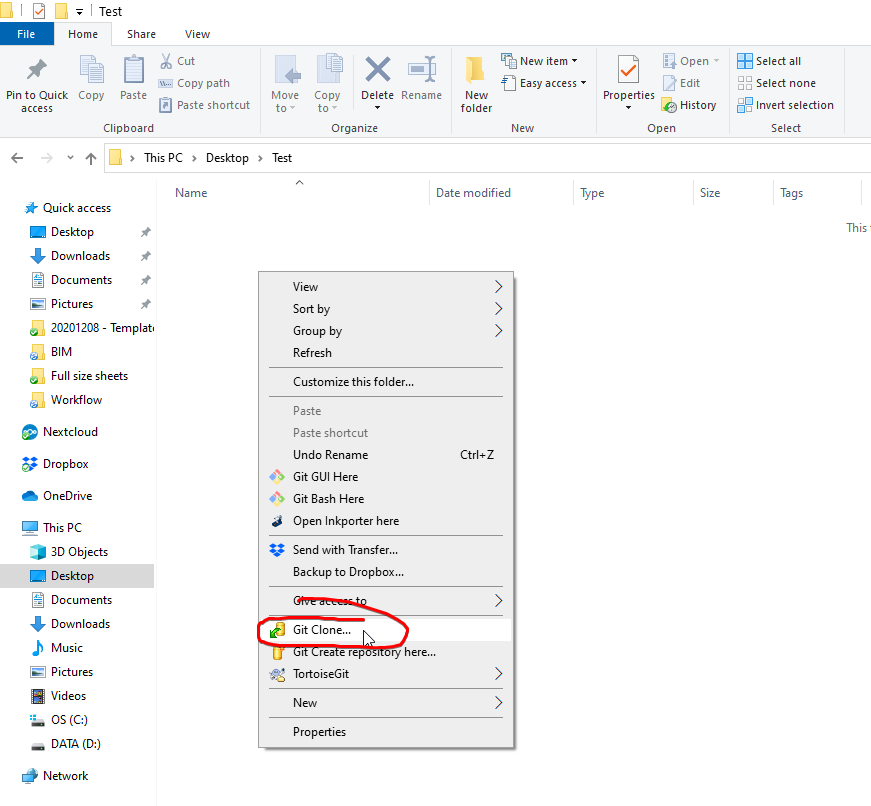
- Go to where you'd like to save the repo, and right click and 'Git Clone...'
- The following fields should already be filed in and then hit 'okay'
Pulling the latest changes down from the remote repo
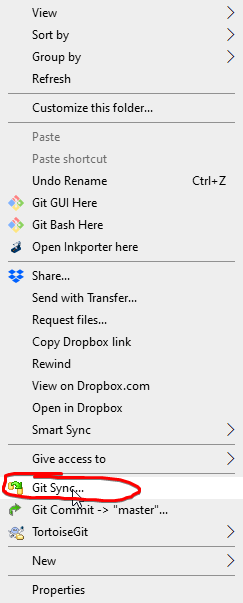
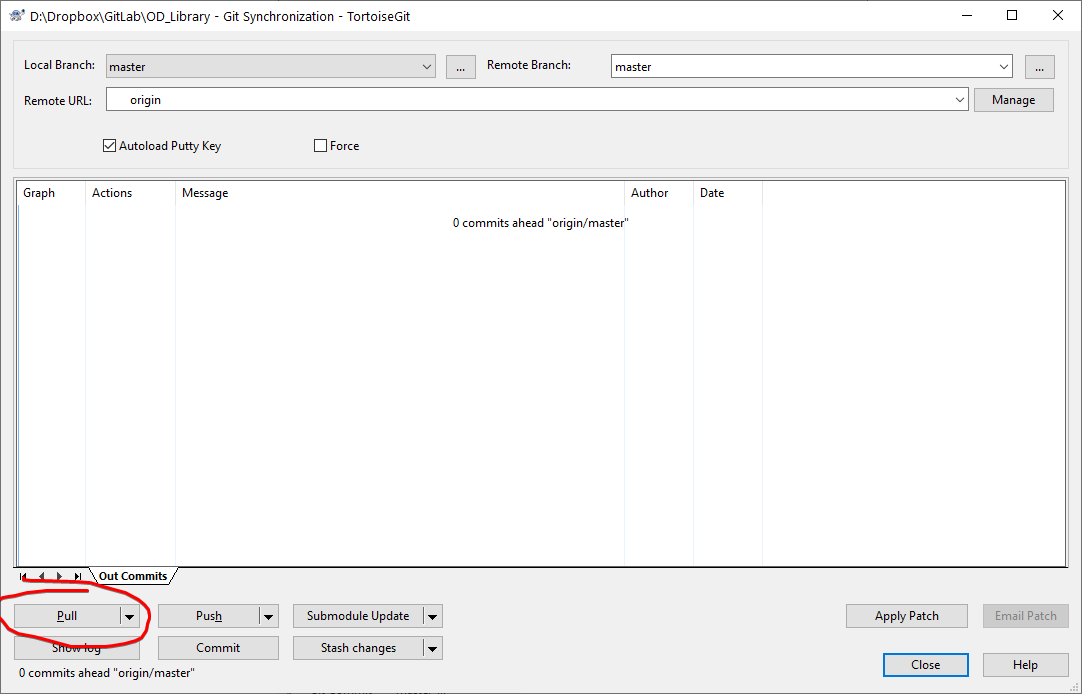
- Right click anywhere in the local folder and go to 'Git Sync'..
- And then 'Pull'
Pushing a change
-
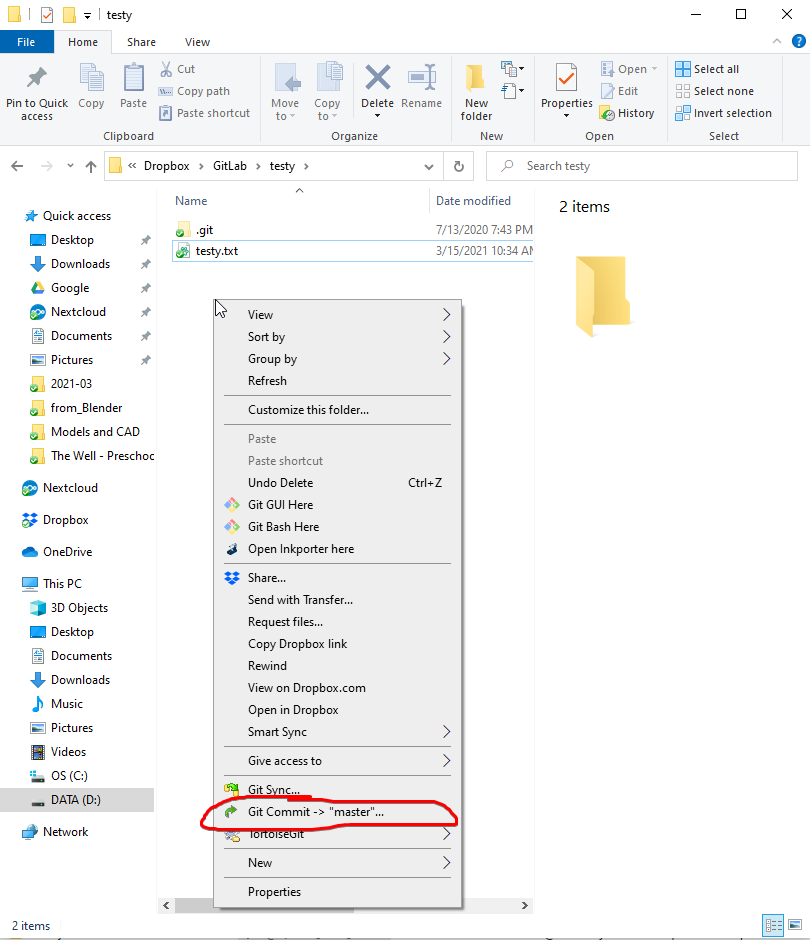
right click anywhere in window to bring up the following context menu. go to Git Commit -> "master"...
-
Fill in the following below, and hit 'Commit & Push'

-
Make sure to hit 'Commit & Push' instead of 'Commit'. Because 'Commit & Push' syncs your change locally and on the remote, whereby 'Commit' just commits your change locally.
Starting a Project
- Create a blank project on Gitlab
- Clone the repo
- Copy in all the template folders located here:
OD_Library\Project Folder Structureand push. - Run git-crypt init
- add users
- Tell collaborators to subscribe to Gitlab notifications.
Revit Specific
- Try not to use the following, if possible...
- Dumb text notes. Prioritize the following instead.
- 1st priority: Material Tags
- 2nd priority: "OD_Keynote_Text Only" generic annotation
- 3rd priority: dumb text
- Detail Lines and Detail Items.
- Use 3D objects as much as possible
- override graphics view by element
- use Visibility/Graphic Overrides for Categories instead, or better yet, use View Templates
- Paint a material on an object. (apply a material via a type, or to entire object)
- Dumb text notes. Prioritize the following instead.
FreeCAD Specific
- Export IFC files very soon and very often, test them in IFC++ first, then in Revit. Detect issues early
- Use simple extrusions as much as possible (Arch Wall/Structures/Panels or Part Extrude)
- Objects exported as IFC structural elements (beams, columns) often give problems in Revit. If needed, use BuildingElement Proxies (Will come as generic models, Revit won't apply any transformation on them)
- Keep list of materials clean, merge duplicates, make sure all objects have a material
---
Creating a New Revit Family
- When creating a new revit family, one of the cardinal rules when making families is that the objects should be constained to reference planes.
- There might be exceptions, but another cardinal rule is to start with a family template of the thing you're modeling... that is, use a window template for windows, door template for doors, etc.
File too large to push to Github
If your file ever gets above 100mbs and you can't push to Github, try...
- Purge all. Run this (3) times to fully purge everything.
- For whatever reason, if you do a 'save as' to a temporary file name, and do another 'save as' to overwrite the original file. it reduces the file size.
Markdown Editor
-
We use markdown a lot. Here's why.
- Godaddy - Workspace Email Help
- Video: How to Set up your GoDaddy Office 365 Email in Gmail (Full Tutorial)
- Incoming settings
- Server name:
outlook.office365.com - Port:
- if POP:
995with SSL selected - if IMAP:
993with SSL selected
- if POP:
- Encryption method:
TLS(POP/IMAP)
- Server name:
-
Outgoing settings
- Server name:
smtp.office365.com - Port:
587
- Server name:
-
Encryption method:
STARTTLSorTLS
Random
- connecting stackedit to gitlab: https://dev.to/maxwhite20062003/how-to-link-your-gitlab-account-to-stackedit-2pkc
Random Errors
-
warning: LF will be replaced by CRLF.
- Solution
git config --system --unset core.autocrlfgit config --global core.autocrlf true
- Solution
-
clean filter git crypt failed
- https://github.com/AGWA/git-crypt/issues/184#issuecomment-541942913C:\Users\ryan.gnupg
-
Git bash Error: Could not fork child process:
- https://stackoverflow.com/questions/45799650/git-bash-error-could-not-fork-child-process-there-are-no-available-terminals/
- kill the 'agent' process that you last used.
- might be: gpg-agent.exe
-
To reset harder!
-
Buffer error
- RPC failed; HTTP 524 curl 22 The requested URL returned error: 524 fatal: the remote end hung up unexpectedly: https://confluence.atlassian.com/bitbucketserverkb/git-push-fails-fatal-the-remote-end-hung-up-unexpectedly-779171796.html
git config --global http.postBuffer 157286400
- RPC failed; HTTP 524 curl 22 The requested URL returned error: 524 fatal: the remote end hung up unexpectedly: https://confluence.atlassian.com/bitbucketserverkb/git-push-fails-fatal-the-remote-end-hung-up-unexpectedly-779171796.html
-
- video
- Might solve following errors
git did not exit cleanly (exit code 128)- This error might be because there's a file with path that is too long
-
assume-unchanged and skip-worktree flags
-
Record audio and mic on ShareX: https://softwarerecs.stackexchange.com/questions/42767/screen-recording-tool-that-records-both-speaker-o-p-as-well-as-mic-input/74728#74728
-f dshow -i audio="virtual-audio-capturer" -filter_complex amix=inputs=2:duration=longest
-
If Gitlab password is not working: https://stackoverflow.com/questions/47860772/gitlab-remote-http-basic-access-denied-and-fatal-authentication/51133684#51133684
%t%pn%y-%mo-%d_%h-%mi-%s_%pn
Setting up LFS
git lfs installgit lfs track "*.psd"
*.rvt filter=lfs diff=lfs merge=lfs -text
*.mp4 filter=lfs diff=lfs merge=lfs -text
*.exe filter=lfs diff=lfs merge=lfs -text
*.ifc filter=lfs diff=lfs merge=lfs -text
*.zip filter=lfs diff=lfs merge=lfs -text
*.pdf filter=lfs diff=lfs merge=lfs -text
Use BFG to migrate a repo to Git LFS
- https://support.atlassian.com/bitbucket-cloud/docs/use-bfg-to-migrate-a-repo-to-git-lfs/
git clone --mirror git@bitbucket.org:<username>/<repo-name>.git- specific example:
git clone --mirror https://hub.openingdesign.com/OpeningDesign/MP3.git
- specific example:
java -jar <path to>bfg-x.x.x.jar --convert-to-git-lfs "*.{png,mp4}" --no-blob-protection <repo-name>.git- specific example:
java -jar C:/bfg-1.14.0.jar --convert-to-git-lfs "*.{rvt,mp4,exe,ifc}" --no-blob-protection D:/MP3.git
- specific example:
Migrating existing repository data to LFS
- https://github.com/git-lfs/git-lfs/wiki/Tutorial#migrating-existing-repository-data-to-lfs
- https://github.com/git-lfs/git-lfs/blob/main/docs/man/git-lfs-migrate.adoc#_include_and_exclude_references
Find Local SSH Key, and connecting it to Gitea
-
Default Location: By default, SSH keys are often stored in the user's home directory. On Unix-like systems (Linux, macOS), the default location is usually
~/.ssh/. On Windows, the default location is typicallyC:\Users\YourUsername\.ssh\. -
List SSH Keys: You can use the following commands to list the SSH keys in your default SSH directory:
-
On Unix-like systems:
ls -al ~/.sshLook for files with names like
id_rsa(private key) andid_rsa.pub(public key).
-
-
Git Config: If you have configured Git to use a specific SSH key, you can check the Git configuration using the following command:
git config --get-all user.email
Gitea with SSH
`echo -n 'a77f94609254188c05662f3ce9ed0c884cd438355c4876aac2c1ddcb72b29b21' | ssh-keygen -Y sign -n gitea -f C:/path/to/.ssh/id_rsa.pub`
Creating SSH key
ssh-keygen - t rsa- pick default location, or change path
- (not sure this step is necessary) Save key fingerprint, and randomart image, by copying and pasting them somewhere for future reference if you need them.
- It creates (2) files in this directory
- One is your private key. Don't share this with anyone.
- example:
id_rsa
- example:
- And the other is your public key. This key you can share with anyone.
- example:
id_rsa.pub
- example:
- files located in for Windows
C:\Users\_[your user name]_\.ssh
- One is your private key. Don't share this with anyone.
ssh-add- If error
Could not open a connection to your authentication agent.- Windows
eval $(ssh-agent)
- Windows
- If error
Vscodium Change marketplace
c57d5aa768/DOCS.md (how-to-use-a-different-extension-gallery)
Create new file at the following location:C:\Users\Owner\AppData\Roaming\VSCodium\product.json
{

"extensionsGallery": {

"serviceUrl": "https://marketplace.visualstudio.com/_apis/public/gallery",

"cacheUrl": "https://vscode.blob.core.windows.net/gallery/index",

"itemUrl": "https://marketplace.visualstudio.com/items",

"controlUrl": "https://az764295.vo.msecnd.net/extensions/marketplace.json",

"recommendationsUrl": "https://az764295.vo.msecnd.net/extensions/workspaceRecommendations.json.gz"

}

}
Installing IFCopenshell
- https://blenderbim.org/docs-python/ifcopenshell-python/installation.html#installation
- via Blender's Python console
OCR
https://ocrmypdf.readthedocs.io/en/latest/cookbook.html
ocrmypdf --output-type pdf input.pdf output.pdf
ocrmypdf --output-type pdf --tesseract-timeout 0 --force-ocr input.pdf output.pdf
Quick Project Setup
./git-crypt init./git-crypt add-gpg-usergit lfs install